Evaluation of and procedure for setting thread ring gages to master
setting plugs.
1. Thoroughly clean, inspect for nicks or damage and calibrate
the truncated master thread setting plug gage. The truncated master
thread setting plug gauge should be straight or have back taper,
no front taper, and be in tolerance. Lubricate the truncated master
thread setting plug gage with a thin film of light oil.
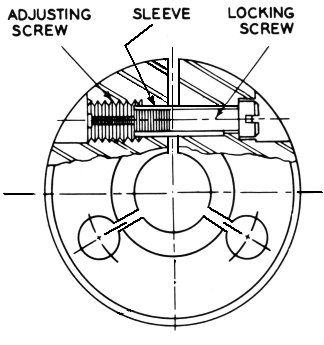
2. Thoroughly clean the thread ring gauge and inspect for nicks.
Remove the sealing wax
with a small pointed knife. Turn the locking
screw counter clockwise until it is loose. Turn the adjusting
screw clockwise, opening the thread ring gage until the master
thread setting plug gauge freely enters. In some cases a small screwdriver
should be levered into the locking
slot area to facilitate opening the thread ring gage as you
turn the adjusting screw.
3. Turn the thread ring gauge onto the truncated master thread
setting plug full form section with no more than one thread of the
thread ring gauge beyond the last thread of the truncated master
thread setting plug gage.
4. Turning the adjusting screw counter clockwise and rotating the
thread ring gauge on truncated master thread setting plug gage until
there is a slight drag between
them. Tighten the locking screw. The thread ring gauge should exhibit
a larger degree of drag or snug fit to the truncated master thread
setting plug gage. This operation may have to be repeated to obtain
the proper degree of drag. The degree of drag is somewhat subjective,
particularly with regards to the size and pitch of the thread ring
gauge and where the truncated master thread setting plug gage is
found to be in its tolerance range. Generally smaller thread ring
gauges and those set to truncated master thread setting plug gages
which are near the low tolerance limit would require less drag than
larger thread ring gauges or thread ring gages set to truncated
master thread setting plug gauges which are on the high limit (**See
note below).
5. After adjusting the thread ring gage and with truncated master
thread setting plug gauge still inserted, the thread ring gage should
be tapped with a brass or plastic hammer to fully seat the thread
ring gauge to the truncated master thread setting plug gage. The
drag after doing this should feel the same as before. If not, the
thread ring gauge was not properly seated. Repeat Step 4.
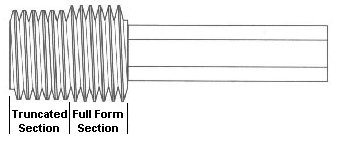
6. Next step is to turn the thread ring gage to the truncated portion
at the front half of the truncated master thread setting plug gauge.
(Figure 1) The drag should be essentially the same. There should
be no shake or play. If there is, the thread ring gage has lost
its root relief or its flank angles are worn out of tolerance and
the thread ring gauge should be reworked or replaced (*See note
below). Remove the thread ring gage from the truncated master thread
setting plug gauge.
7. To test the thread ring gage for taper or bell mouth, turn the
thread ring gauge onto the truncated portion of the truncated master
thread setting plug gage 1-1/2 to 2 turns. You should detect some
drag. Continue turning the thread ring gauge onto the truncated
master thread setting plug gage noting any definite difference in
the degree of drag. If the drag increases, this indicates an unacceptable
bell mouth or taper condition. Remove the truncated master thread
setting plug gauge and follow the above procedure for the other
side of the thread ring gage. The fit should be about the same on
both sides. If the thread ring gauge is bell mouthed or tapered,
it should be reworked or replaced (*See note below).
8. The minor diameter of the thread ring gage can be measured with
an internal measuring machine or Go and NOGO X tolerance plain plug
gauges. The minor diameter of the thread ring gage is in tolerance
if the Go X tolerance plain plug gauge enters and the NOGO X tolerance
plain plug gage does not.
9. It is strongly recommended that once the thread ring gauge has
passed all the above, the locking screw and adjustment screw holes
be filled with sealing wax to prevent any tampering.
10. You are now ready to place the ring gage into service.
* NOTE: To have your gages calibrated, repaired or replaced, click on the Calibration Request for Quote Form (Recommended Browser: Internet Explorer) or contact us here.
** NOTE: A thread ring gage's setting is unique to the particular
truncated master thread setting plug gauge the thread ring gage
it is set to and cannot be expected to be duplicated on any other
truncated master thread setting plug gauge without readjustment.
This is because of differences in allowable gage maker tolerance
on lead, angles and pitch diameter for the truncated master thread
setting plug gauge.
Comments:
Original Posting: 3/1/2007
Last Revision: 3/6/2015
Error corrections in, or comments about, the above data can be sent to: office@gagecrib.com
Gage Crib Worldwide, Inc.
6701 Old 28th St SE, Suite B
Grand Rapids, MI 49546-6937
Phone: 001-616-954-6581 • Fax: 001-616-954-6583 CONTACT FORMS & INFO